DNS Hijacking Fix: Stop the Attack and Secure Your Network
By Veilock Team · Veilock · Published July 29, 2026 · Updated August 28, 2026 · 11 min read

Stop a live DNS hijack in three moves: disconnect the affected network, set your device DNS to a trusted resolver like Cloudflare’s 1.1.1.1, and change your router admin password and registrar credentials from a clean device. Those three actions contain most attacks within 5–15 minutes. Then verify with nslookup or dig that your queries resolve to the correct IP, not an attacker-controlled address. DNSSEC and a VPN like Veilock add protective layers after you’ve stabilized the situation.
First 5–15 minutes checklist:
- Disconnect the suspect network from the internet (unplug WAN or disable Wi-Fi)
- Set device DNS manually to 1.1.1.1 (Cloudflare) or 8.8.8.8 (Google) on a clean device
- Run
nslookup yourdomain.com 1.1.1.1to confirm expected IP resolution - Change router admin password from a clean, separate network
- Change registrar and email account passwords; enable MFA immediately
- Do not factory-reset the router yet — preserve logs for evidence
Table of Contents
- How to fix a DNS hijack: immediate isolation steps
- Remediate and harden your router after a DNS attack
- Clean and verify every connected device
- Recovering a hijacked domain: registrar and DNS host steps
- Prevent future DNS hijacks with layered defenses
- Where VPNs help with DNS hijacks — and where they fall short
- Key Takeaways
- The Veilock team’s perspective on DNS security
- Veilock protects your DNS queries while you secure your network
- Useful sources and further reading
How to fix a DNS hijack: immediate isolation steps
The correct remediation sequence is isolate first, remove attacker access second, restore clean configuration third. Skipping to restoration without removing access causes immediate reinfection.
- Disconnect WAN. Pull the ethernet cable from your modem or disable the router’s WAN interface. Skip this step only if critical devices (medical equipment, VoIP phones) depend on that connection.
- Isolate affected devices. Move suspect machines to a guest VLAN or unplug them from the network entirely. Instruct anyone on the network to stop entering passwords or accessing banking sites.
- Run an authoritative resolution test from a clean device. Use mobile data or a trusted external network. Run
dig yourdomain.com @1.1.1.1and compare the returned IP to your expected record. Screenshot the output — it’s your evidence. - Change critical credentials. From the clean device, update your router admin password, registrar login, and the email address tied to your registrar account. Enable MFA on each.
- Document everything before touching the router. Screenshot the router’s DNS settings, connected devices list, and any syslog entries before making changes.
Pro Tip: Do not factory-reset the router before exporting its configuration and logs. A reset wipes the forensic trail you need to understand how the attacker got in. Export first, reset only if the device appears irreparably altered.
Remediate and harden your router after a DNS attack
Preserving volatile evidence before touching the router is the step most guides skip. Do it first.
- Log into the router admin panel (typically 192.168.1.1 or 192.168.0.1). Screenshot the current DNS server fields, firmware version, and any unfamiliar admin accounts.
- Export the router config and syslog if your firmware supports it.
- Replace any unknown resolver IPs in the WAN DNS fields with trusted resolvers: 1.1.1.1 (primary) and 1.0.0.1 (secondary), or 8.8.8.8 / 8.8.4.4. Save and apply.
- Restart DHCP on the router so connected devices receive the corrected resolver.
- Rotate the router admin password to a unique, strong credential (16+ characters, no dictionary words). Remove any admin accounts you didn’t create.
- Disable remote management unless you specifically need it. If you do need it, restrict access to a single trusted IP address.
- Update router firmware to the latest stable vendor release. If the vendor has stopped issuing patches for your model, isolate or replace the device.
- If the device appears irreparably altered, factory-reset it after evidence capture, then reconfigure from scratch using the steps above.
Prefer encrypted resolver connections. When your router and upstream resolver support DNS-over-HTTPS (DoH) or DNS-over-TLS (DoT), enable them. DoH encrypts queries in transit, making on-path interception significantly harder. Validate the new resolver settings from an external clean network after applying changes.
Worth knowing: After reconfiguring, verify from a separate network using dig yourdomain.com @1.1.1.1 rather than from the same router you just changed. A local test can mask problems that external clients still see.

Clean and verify every connected device
Fixing the router isn’t enough if a device still has malware or a poisoned local cache pointing to attacker IPs.
Malware and hosts-file check:
- Run a full antivirus scan on Windows, macOS, and Linux endpoints. On Windows, Windows Defender or Malwarebytes covers most threats; on macOS, Malwarebytes for Mac is a reliable option.
- Check the hosts file for unauthorized entries:
C:\Windows\System32\drivers\etc\hostson Windows,/etc/hostson macOS and Linux. Remove any lines you didn’t add. - Reset device DNS settings to 1.1.1.1 in your network adapter settings (Windows: Network & Internet Settings; macOS: System Settings > Network > DNS).
Flush DNS caches by platform (platform-specific commands):
- Windows:
ipconfig /flushdns - macOS:
sudo dscacheutil -flushcachefollowed bysudo killall -HUP mDNSResponder - Linux (systemd):
sudo systemd-resolve --flush-caches
Verification steps:
- Run
nslookup yourdomain.comagainst your local resolver and compare the result tonslookup yourdomain.com 1.1.1.1. - Run
curl -v --head https://yourdomain.comand confirm the TLS certificate matches your expected issuer and domain. - If a device still resolves to attacker IPs after the flush, isolate it, capture a final screenshot of its DNS settings, then re-image or factory-reset it.
Recovering a hijacked domain: registrar and DNS host steps
If the attack reached your registrar account, the router fix alone won’t help. Registry lock prevents unauthorized NS/DNS changes even when credentials are stolen — it’s the highest-value registrar control available.
- Contact registrar support immediately. Request an account lockdown and ask them to roll back any unauthorized DNS changes. Provide timestamps, screenshots, and your account verification details.
- Change your registrar password and the email address tied to the account from a clean device. Revoke any active sessions.
- Enable MFA on the registrar portal and your DNS management console.
- Enable registry lock or client lock. This requires an out-of-band confirmation (phone call or physical verification) for any future NS record changes.
- Audit and revert NS, A, MX, and TXT records to the last known good state. Cross-reference against a recent DNS export or a cached copy from a tool like SecurityTrails.
- Quarantine unused records for 30 days before permanent deletion rather than deleting them immediately. Legacy systems sometimes depend on records that look abandoned.
What to provide to registrar support:
- Account username and verification details
- Timestamps of the first suspicious activity
- Screenshots of unauthorized record changes
- Any access logs you can export from the portal
If support is slow, escalate to the registrar’s abuse team and, for .com/.net domains, ICANN’s Compliance department at icann.org/resources/compliance.
Prevent future DNS hijacks with layered defenses
Monitoring authoritative records and alerting on unexpected changes is the single highest-value detection measure for domain owners. Everything else builds on that foundation.
Core defensive controls:
- Enforce strong, unique passwords and MFA on all DNS-related accounts
- Enable DNSSEC where your registrar and DNS host support it; it cryptographically validates DNS responses and reduces cache poisoning risk
- Keep a firmware inventory and apply updates monthly
- Quarantine unused DNS records for 30 days before deletion
- Use encrypted resolvers (DoH/DoT) on routers and endpoints
Monitoring practices:
| Action | Frequency | Tool/Method |
|---|---|---|
| Poll authoritative NS/A records | Daily | dig, SecurityTrails, or a DNS monitoring service |
| Review Certificate Transparency logs | Weekly | crt.sh |
| Audit registrar login history | Monthly | Registrar portal logs |
| Check router firmware version | Monthly | Vendor release notes |
| Run dig from multiple vantage points | Weekly | External VPS or online dig tools |
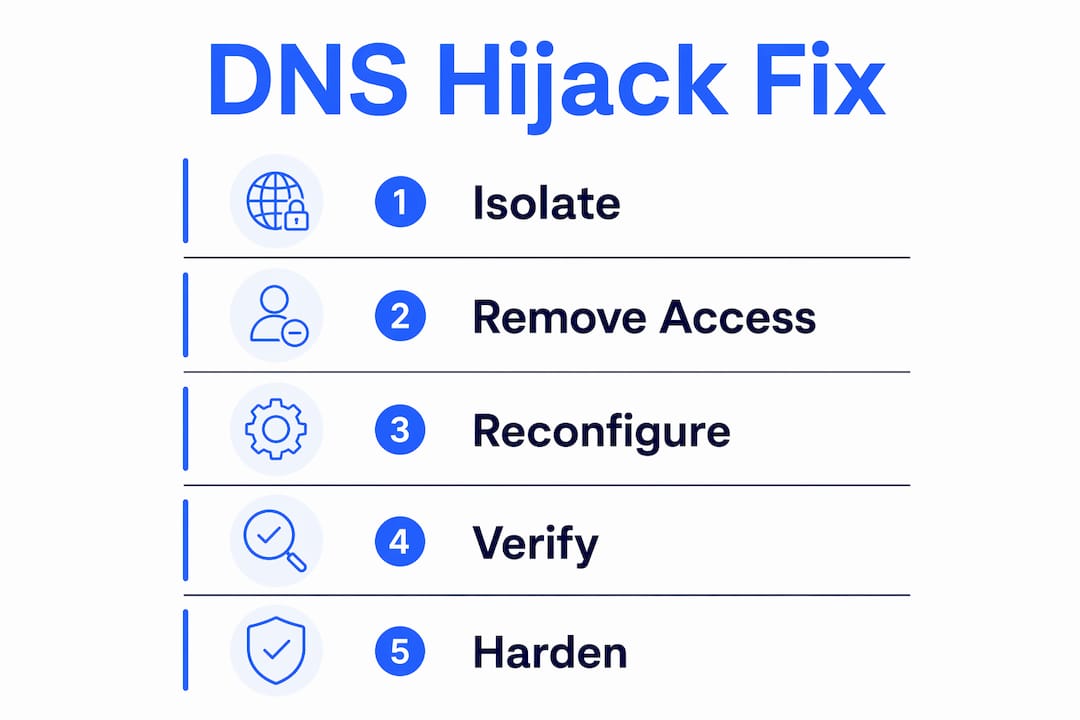
Checklist-driven remediation reduces attacker dwell time by roughly 60–80% compared to ad-hoc responses. That gap is why a written runbook matters even for a home network. For teams managing multiple sites, the dwell time impact of a delayed response compounds quickly across assets.
Where VPNs help with DNS hijacks — and where they fall short
A VPN encrypts DNS queries and routes them through private servers, which prevents on-path interception and ISP-level tampering for connected clients. That’s a real and meaningful protection. But it has clear limits.
What a VPN protects:
- DNS queries from your device to the VPN’s resolver (encrypted in the tunnel)
- Traffic on untrusted networks (public Wi-Fi, hotel networks, ISP-level manipulation)
- Queries from being observed or altered by your ISP or a network-level attacker
What a VPN does not fix:
- A compromised router that hands out malicious DNS before the VPN tunnel is established
- Stolen registrar credentials or attacker-controlled authoritative name servers
- Malware on the endpoint that intercepts DNS before the VPN client sees it
Configuration tips to get the most from your VPN:
- Enable DNS-over-HTTPS inside the VPN client if supported, so queries are encrypted even within the tunnel.
- Enable the VPN kill switch to block all traffic if the tunnel drops, preventing DNS leaks to your ISP.
- Choose a server geographically close to you for lower latency and more reliable resolution.
- After connecting, run a DNS leak test (dnsleaktest.com) to confirm all queries exit through the VPN’s resolver, not your local one.
If your router is compromised, connect the VPN from a clean device on mobile data first, then remediate the router. The VPN won’t fix the router, but it protects your credentials while you work.
Key Takeaways
A successful DNS hijacking fix requires isolating the network first, removing attacker access second, and restoring clean configuration third — in that exact order.
| Point | Details |
|---|---|
| Isolate before restoring | Disconnect WAN and change credentials before touching DNS records; restoring first causes reinfection. |
| Preserve router evidence | Export logs and config before any factory reset; forensic data determines how the attack entered. |
| Flush caches on every device | Use platform-specific commands (ipconfig /flushdns, dscacheutil, systemd-resolve) after fixing the resolver. |
| Registrar lock is high-value | Registry lock or client lock blocks unauthorized NS changes even when credentials are stolen. |
| Veilock adds a DNS privacy layer | Veilock’s DoH support and kill switch protect DNS queries in transit during and after remediation. |
The Veilock team’s perspective on DNS security
Most DNS hijack guides treat the VPN as an afterthought — a checkbox at the end of a long remediation list. That framing undersells what encrypted DNS transport actually does during an active incident. When your router is suspect and you need to verify records or change registrar credentials, doing that work over an unencrypted connection on a potentially compromised network is a real risk. Routing those actions through a VPN with DoH enabled means the queries themselves can’t be intercepted or redirected while you’re mid-remediation.
The limit is equally real, though. A VPN cannot reach back and fix a router that’s already handing out attacker-controlled resolvers. It cannot undo stolen registrar credentials. Treating it as a complete solution rather than one layer in a stack is where people get into trouble.
At Veilock, the features we care about most for this use case are the ones that matter when the network itself can’t be trusted: AES-256-GCM encryption, DNS-over-HTTPS, a strict no-logs policy, and a kill switch that cuts traffic if the tunnel drops. Those aren’t marketing features — they’re the controls that matter when you’re working on a network you don’t fully trust yet.
Veilock protects your DNS queries while you secure your network
After a DNS hijack, your network is an untrusted environment until remediation is complete. Veilock gives you an encrypted tunnel to work through during that window — with DNS-over-HTTPS built in, a kill switch that prevents DNS leaks if the connection drops, and a no-logs policy that means your activity during remediation stays private.
Plans start at $4.46/month. Veilock’s Vortex threat-blocking feature also filters malicious domains at the network level, adding a second line of defense against the phishing infrastructure attackers use after a successful hijack. For readers in restrictive environments, Veilock’s censorship-bypass VPN uses obfuscated connections that look like regular HTTPS traffic, keeping you connected even when standard VPN protocols are blocked. Check available plans at veilock.com and get the tunnel running before your next remediation step.
Useful sources and further reading
- DNS Hijacking — UK Government Security — Authoritative government-level overview of DNS hijacking causes, fix steps by user role, and registrar-level controls including client lock and DNSSEC. Screenshot this page before contacting your registrar.
- Defend SOHO Routers from DNS Hijacking — CyberReplay — Detailed SOHO router remediation checklist with evidence preservation guidance and remote-site verification steps. Especially useful for small office environments.
- What Is DNS Hijacking? — PowerDMARC — Covers router remediation steps and platform-specific DNS cache flush commands for Windows, macOS, and Linux.
- DNS Hijacking Detection and Prevention — Palo Alto Networks — Explains registry lock, client lock, and the 30-day record quarantine practice for domain owners.
- DNS Hijacking Causes, Signs, and Protection — VergeCloud — Covers the correct remediation sequence (isolate, remove access, restore) and enterprise-specific recovery steps including secondary DNS validation.
- DNS Hijacking Types, Detection, and Prevention — Have I Been Squatted — Focuses on monitoring authoritative records and alerting practices; useful for setting up ongoing detection after remediation.
This article is general informational guidance, not professional security or legal advice. Confirm current procedures with your router vendor, registrar, and a qualified security professional for your specific situation.
Related reading on Veilock
About the author
Veilock Team · Veilock